As I've been using Unity a lot in recent university projects I thought I should write up some of what I've done to show people how I managed to get certain parts working.
For this I used Playmaker which is a visual scripting tool available on the Unity Store but everything can be done in code providing you know how, I'm not going to explain it like that here though as I am not a programmer and will end up confusing you all.
First off I'm going to do an article about poison damage, this is applied randomly with a 1 in 4 chance on taking a hit and will do damage over time until the players health is too low or they heal using an object.
Setting the Health
First off it's important to set the health for the player, so on the Player Character you need to set up a Playmaker FSM, I labelled it health so I don't get it confused with other FSMs. The first thing you need to do is set a global float variable, I called it 'Health'.
Once this is made select the first state and add a 'Set Float Value' action which sets the global variable 'Health' to 100 (or whatever number you want).
You can also add another 'Set Value Float' for 'Max Health' and then use a 'Float Clamp' where you set 'Health' to a minimum value of 0 and a maximum value of the variable 'Max Health' before ticking the 'Every Frame' box (If you do not set up your health in the idle state then you need to move the float clamp to your idle so that it checks it constantly) that way our health can never exceed the maximum health if something does damage to our total amount of health. This will not be used with out poison but I mentioned it anyway so you can have more freedom to experiment.
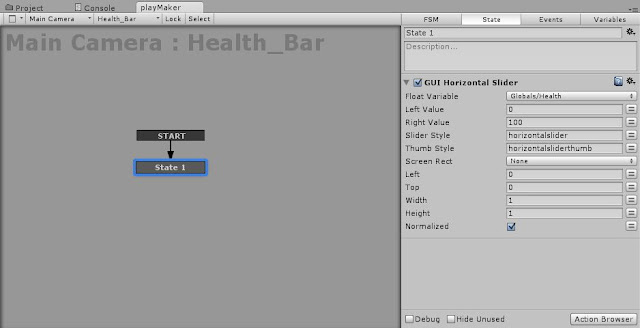
Finally you will want to set up a health bar so you can see you damage in action. The best way I found to do this was to set up a new FSM on the main camera and then add the action 'GUI Horizontal Slider' and setting the float variable to 'Health'. The slider will show your health and can also be controlled by the designer for play testing, but is obviously not a final solution to a health bar.
Setting up the Poison
To set up the poison in my scene I used a simple cube which damages you on collision, if you have a better AI in place by all means use that, but if this is just a test as mine is then a cube will suffice.
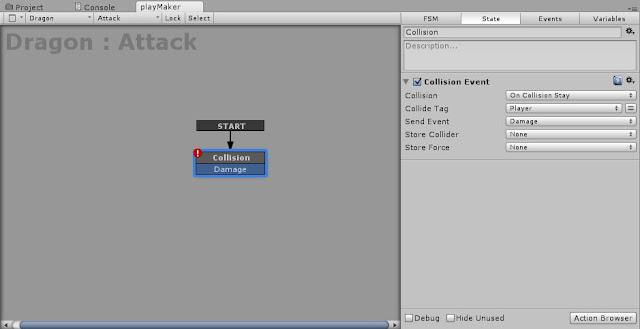
To quickly set up the AI to do damage on contact then add an FSM to the AI, I called it 'Damage'. In the first state set a 'Collision Event' action which 'On Collision Stay' with the tag 'Player' sends an event, in my case I created an event called 'Damage'.
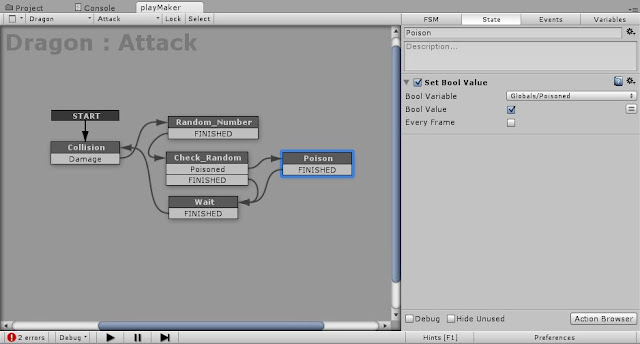
Now I'll create a random element to the poison damage, this is not important but can be added to add some variety. I created a new state which was linked with the 'Damage' event so that on contact with the Player it goes to this new state. I then added the 'Random Float' action and set it to pick a random number between 0 and 3. It then stores this result in a variable called 'Poison_Random'. Then on the 'FINISHED' event send it to a new state.
This new state will now test the random number and if it matches then the player shall become poisoned. To do this we add an action called 'Float Switch' which tests the float variable 'Poison_Random' with 1 float switch which looks to see if the variable is less than 1, if so send event 'Poisoned'. Then add the transitions of the 'Poisoned' event and 'FINISHED'.
First we will link the 'FINISHED' transition to another state as this is easier to set up, in the new state simply add a 'Wait' action which waits for however long you want between attacks and how often it tests poison, in my case I used 6. Then link the 'FINISHED' transition to the 'Collision' state so it loops again.
Finally we finish off this FSM by adding a new state which happens when the 'Check_Random' state finds he is poisoned. This state will have a 'Set Bool Value' action and it will set a new global boolean variable called 'Poisoned' to true. That's all there is for setting up the poison. Next we need to effect the health of the character, this will be done on the character himself.
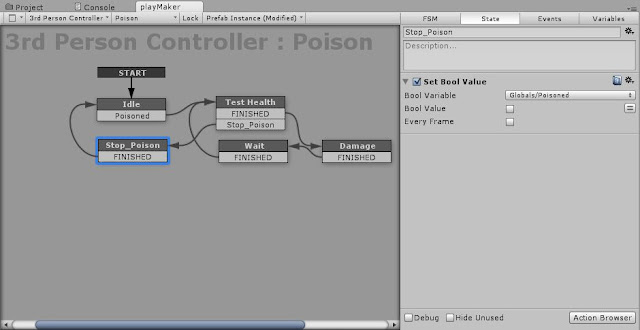
Now we move over to the Player Character and set up a new FSM separate from the Health set-up. This starts in an state I named 'Idle' as it currently does nothing. It has a 'Bool Test' action on is which tests every frame to see if the global variable 'Poisoned' is true, if it is false it does nothing, if it is true to transitions to a new state.
This state then takes you to a damage state, where a 'Float Add' action is waiting which adds -1 to the global variable 'Health' meaning it takes 1 HP away. This then has a 'FINISHED' transition to another state which contains a 'Wait' action which waits a second. This connects on a 'FINISHED' transition to another state which has a 'Float Switch' action which looks to see if the global variable 'Health' is less than 11 (this can be changed to suit your game) if it is then send an event called 'Stop_Poison'. There is also and action underneath this called 'Bool Test' which double checks that the global variable 'Poisoned' is still true, this will come into effect when you are cured of the poison.
We then need to link these in a specific way. The start 'Idle' state should go to the 'Test_Health' state, then on the 'FINISHED' transition link it to the 'Damage' state which then links to the 'Wait' state and back round to the 'Test_Health' state. This means it will continue to do damage unless the Player's health drops below 11 or if he heals.
The final state you need to add is to stop the poison. Link the 'Stop_Poison' transition from the 'Test_Health' state to a new state which has a 'Set Bool Value' action in it, then get it to set the global variable 'Poisoned' to false before linking it thought the 'FINISHED' transition back round to the idle so it waits for the Player to be poisoned again.
Congratulations you have working poison (hopefully).
Curing the Poison
So now the Player can get poisoned, great! But it sucks that he can't cure it. Here I'm going to add a simple object in the environment which when the player is near it he can press a key to heal himself and remove the poison.
You can create a new FSM for this but I used the same FSM we used to set up the health, it's up to you what you decide. So after setting up the 'Health' variable it transitions to an 'Idle' state where it checks for collision using the 'Trigger Event' as my healing cube has a collision box around it, I then set this collision cube up with a unique tag which it checked for. This checks for the player entering the trigger, and if it is found to be true then send the event 'Fountain' (as in this case the healing cube will eventually be a fountain) This then links it to a new state.
This state has an action on it called 'Get Key Down' which checks for the Player making key presses. In this case I used the 'F' key. If this is pressed then send a new event I called 'Heal'.
This new state also has another 'Trigger Event' which checks if the Player has left the trigger with the correct collide tag, if so it sends an event which links back to the idle state, so if he leaves the trigger box he can no longer heal.
Then simply add a new state which the 'Heal' event is connected to which has an event on it called 'Set Float Value' which sets 'Health' to 100 again and has another action 'Set Bool Value' which sets the global variable 'Poisoned' to false. This comes into effect back when we set up the poison on the AI as it will break to damage loop and return to idle awaiting more poison.
When this state is finished link it back to the 'Fountain' state so that you can either heal again or it checks that the player has left the fountain and your done, healing and curing the poison complete!
This is by no means the only way to set these functions up, probably not even the best, but for testing or for a something that doesn't require top end programming such as the university course I'm on it works just fine.
Hopefully you got all that, if you found any of it confusing or found a problem with it then drop me an email, if can be found on my contact details page. Alternatively you can check out my beginners guide to Playmaker if you are confused with how to work Playmaker.
Thursday, 20 December 2012
Unity - Playmaker For Beginners
As I have been using a fair amount of Playmaker in Unity for my university project I thought I would do some tutorials on how to set up certain simple components. But before that I'm going to do a quick crash course on what Playmaker is and how to use it.
Playmaker is an add-on for Unity which can be downloaded from the Unity store for around $100 (sometimes this drops and when I picked it up it cost around $25). It is a visual scripting tool for Unity which makes scripting easier for people who do not know the coding sintax. This works well for our university as we are on an art based course so it allows us to do some programming without learning and coding. That being said this is not a miracle program, while it is very useful for me it will have no use to someone who is fluent in a coding language and will have limited use to people who struggle getting their head around the concept of coding.
FSMs
FSM is short for finite state machine and it is a series or events which trigger on certain commands which set how things will react in game. There is no need to understand any complexities about it, it is much more simplistic than it sounds.
When you select and object you wish to use Playmaker on and then open the Playmaker window (Open Playmaker on the top task bar and then Playmaker Editor) you will be presented with an empty editor. To start editing you need to add an FSM by right clicking the empty workspace and selecting 'Add FSM'.
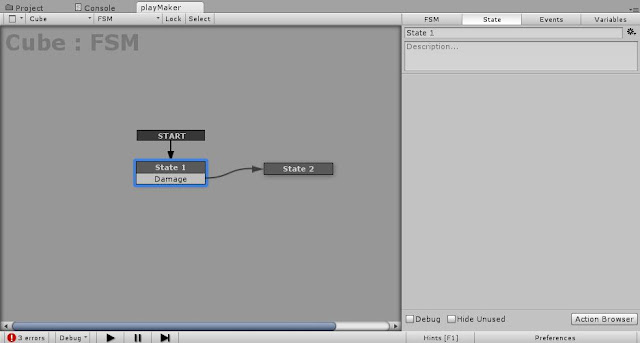
When you select this two boxes will appear. One says 'Start' and it has an arrow pointing to a box saying 'State 1'. Start signifies where the FSM will begin (go figure) and it will begin with 'State 1' unless you state otherwise.
This state is where the magic happens, within this state you can set 'Actions' to tell the state to trigger certain events, you have 'Events' which are used to transition between states and you have 'Variables' which are used to store different types of information which change. An example of a variable will be the Player's health. It may begin at 100 but when damage is done to the Player this variable number will change.
Variables
Let's start simple, the variables can be set up by clicking the variables tab on the left side of the Playmaker window. This takes you to a different page where any variables can be stated quickly and easily.
To declare a variable simply type in a new variable name at the bottom where is says 'New Variable' and then select the variable type. Here is a quick list of some of the different types of variables I use often:
Float : A number with decimal places
Int : Integer - A whole number
Bool : Boolean - A true or false statement. (Sometimes 0 and 1 are used instead of true and flase)
Game Object : A game object within the scene
Vector2 : Used to define the X and Y values of something
Vector3 : USed to define the X, Y and Z valuse of an object, such as it's position in world space
Global variables can be created by clicking the 'Global Variables' button at the bottom of the 'Variables' page then create it as you would normally. Global variables allow other FSMs to read the variable.
As an example to set the health up type 'Health' into the 'New Variable' box and then select the 'Float' type. This sets the health as a number value which can enter decimal points if need be.
Now when you select it you can set the float value to start with, I'll set mine to 100. You can also tick the inspector box if you wish and it will show the variable in real time as you play in the inspector window of Unity.
States
States are simple to set up, right click in the work space and select 'Add New State' simples. You transition between states using events.
Events and Transitions
Events are even more simple to set up as they do not hold any values, they simply wait to be called forwards and then send the FSM in the right direction. To set up an event select the 'Event' tab next to the 'Variable' tab and it will allow you to create events in much the same way as variables. Simply enter the name of the event and hit enter. Here I have created an event called 'Damage'.
The tick box to the left of an event sets it to a global event so that other FSMs can be set to different states depending on what information has been sent. To use the event right click the state you want to transition from and select 'Add Transition' then select the transition you want. You can then left click the new transition and drag the arrow over to the state you want it to go to. Once that event is triggered by an action then the FSM will transition to the next state.
Actions
Actions are used to tell the FSM what to do and to allow you to have control over what the states are doing. These can be created by going to the 'State' tab and the clicking the 'Action Browser' button at the bottom. This will bring up a long list of all the controls you can use, you can search for one by name or you can search for them by category.
For this example I will set it so that when you press a key it will reduce you health to a half, if you ticked to show the 'Health' variable in the inspector you can view this to see if it works.
Got to the action browser and find or search for the action 'Get Key Down', this checks to see if a Player has pressed the key, then select the 'Key' to be whatever key you want to use, I'll use 'E' then set the 'Send Event' function to the 'Damage' event we made earlier. The store result can be left as 'None' for this action.
This now waits for the 'E' key to be pressed and when it is it sends the event 'Damage' which is set to transition from 'State 1' to 'State 2'. The FSM will now complete whatever 'State 2' is set to do, which for now is nothing.
Click on 'State 2' now and open the 'Action Browser' and select 'Set Float Value'. Set the 'Float Variable' to the 'Health' variable we created earlier and and set the 'Float Value' to 50, which is half the health.
Finally add a 'FINISHED' transition which is already set up in Playmaker and link it back to 'State 1' so that it can be done again. If you play the game and press 'E' now you should see you health reduce to 50.
Other Playmaker Information
Playmaker has other useful functions like being able to access scripts and interact with them. You can also watch Playmaker work while you play in real time so you can see exactly where it is and what it's doing, this is exceptionally useful when trying to find out why you FSM is not working.
You can rename states when you have them selected by going to the 'State' tab and typing in the name where it specifies the state name and then hitting enter. This is definitely advised when working with larger FSMs or watching the FSM play to look for bugs.
You can also rename FSMs by clicking the 'FSM' tab and typing the name in the top and hitting enter. This is useful when you have more than one FSM on an object.
I have only been playing with Playmaker for a short while and I'm by no means to programmer or anything of the sort. But I do find it enjoyable and a fun challenge so I intend to play with it much more. So if you have any queries or what some help I'll be happy to try, chances are I won't be able to help but it's worth a try, you can email me by using the email address on the 'Contact Me' tab at the top of this site. Thanks.
Monday, 5 November 2012
Maya - File Opening Bug
So I opened my file today and found that it had broken. Some polys we're missing, some points moved, some colours changed...well...just take a look for yourself.
Congratulations, you just got a sneak peak of my Thor model before anyone else! (woohoo....)
You may not be able to tell from the photo but may of the polys and his chest and especially around the mouth are missing, as well as the weird poly that's appeared between the neck and the chest plate.
Cause
Cause
The cause of this seemed to be that when the file opened it tried to replicate my history (obviously I didn't delete it as often as I should...whoops) and it came up with error such as:
'Warning: Can't perform polySplit49 on selection'
'Warning: Can't perform polyDelEdge18 on selection''Warning: Can't perform polySplit50 on selection'
'Warning: Can't perform polySoftEdge21 on selection'
ect...
Fix
After much googling and trying to get old files to work I was close to giving up and simply repairing the damage that had been done, deleting the history before saving again. Luckily I happened upon a passing comment on a forum that mentioned using the 'dgdirty -a' command which was accompanied by a link on what to do, unfortunately the link was old and broken. I simply typed 'dgdirty -a' without the quotation marks into the MEL script box within Maya and hey presto, good as new.
Hope this helped. Good Luck.
Maya - Interactive Split Tool
Maya has an amazing tool called Interactive Split Tool, it is used to make nice clean cuts across polygons and is great for creating edge loops and fixing topology. Unfortunately it's still new, and as such it's prone to bugs. Sometimes the tool completely refuses to cut, sometimes it cuts but not what you asked it to do.
I would love to offer a fix to this, but I couldn't find one, I still use to very often but I found an alternative to it for the few times it decides it's not going to listen. You can still access the old tool which this tool replaced called the Split Polygon Tool. This can be accessed by going in to object selection mode, holding shift and right-clicking your model, then select Split > Split Polygon Tool. You can then hold Shift while clicking to snap it to points.
I don't think this tool is as nice to use, or as clean, but it does the job when I really need something done and the the Interactive Split Tool is having one of them days.
Subscribe to:
Comments (Atom)


